

Fabric Art & Accents
Wednesday, 10 March 2010 03:00

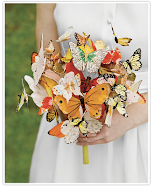
Flowers are the RAGE these days. Wear them in your hair, on your wrist, a jacket or a coat, on a velveteen ribbon around your waist... or sew several to a pillow, fill a bowl, upscale a gift. If you're planning a wedding, these airy flowers add an etherial, romantic touch wherever you use them. They can be rather expensive to buy, but are downright cheap to make. And with just a little practice you can turn out a dozen of these beauties in one afternoon.

I've always enjoyed melting things, and these flowers give me a legitimate reason to light a candle and melt some fabric. Because, that's really all you do to make these flowers. Synthetic fabrics will melt when held near a flame. They will also ignite if you put them too close, so before you get started, look for a draft-free spot away from anything flammable where you can focus on what you're doing (without helpful kiddos or pets).
Fabric and Other Supplies

•A heat source. I use a votive candle because it will burn a long time and it's short, so I can sit while I work. Some people use a lighter, but I find that more difficult to control. Some people use a jar candle, but I often use the slightly cooler side of the flame to melt more heat-sensitive fabrics (like organza).
•A pattern ( optional, cutting free-form flowers is faster and can look great). I've included two templates. If you are cutting a bunch of pieces, cut the outer pieces first so you can keep using the same pattern by cutting it smaller and smaller. You can cut through several layers of fabric at a time.

•Beads or buttons . For the center of the flower, you can sew in a fancy rhinestone button, or a single pearl bead (as shown above), or a half-dozen seed beads.
•Aluminum foil. I usually work on a piece of aluminum foil. It's non-flammable and if there are drips, I have not ruined anything.
•A sewing needle
•Thread in a coordinated color, or a transparent/invisible nylon thread
•Straight pins
•Scissors
•Bottle of water (just to be safe)
Getting Started
1.Find a draft-free location to work. The smallest breeze moves the heat from your candle and changes how it affects the flower. If you can avoid any draft, you can maintain significantly better control.
2.Before you cut out your flowers, I suggest that you cut several free-form circles and practice with them until you get the hang of it.
3.If you choose to use a template, download and print the Circle Template and/or Flower Template.
4.Determine how many flowers you want to make, the size and relative fullness. You can use as few or as many layers as you like. Generally at least five or six layers are needed, but you can use many more if you want to make a big full flower. The flower shown above is five inches and has thirteen layers. Begin with a slightly larger size shape than you want for your finished flower because the heat and melting will shrink the fabric.
Making the Flower
1.Cut your shapes.
2.Hold one piece at a time over the candle flame. You don't need to be very close to the flame for the fabric to begin to melt. Slowly rotate the fabric until you have gone all the way around and have achieved the style of edge you like.
3.Start with the your largest piece and work down to the smallest.
4.Stack your layers from largest to smallest. The flowers actually look prettier if you're not too perfect in how you arrange them.
5.Shift layers from side-to-side until you achieve a natural look.
6.Pick up your flower, keeping a finger in the center and at the base so your arrangement doesn't slip. Use a straight pin from the backside through the uppermost layer and back to the back side as shown.

7.Sew your bead or beads into place.
Hints and Tips
If you want to attach your flower to a barrette or a headband, for example, you can sew your flower to a piece of felt that can in turn be sewn onto the top of a barrette or to headband.


No comments:
Post a Comment